Step-By-Step Guide To Implementing Size Charts
Let’s Make Your Size Charts Shine!
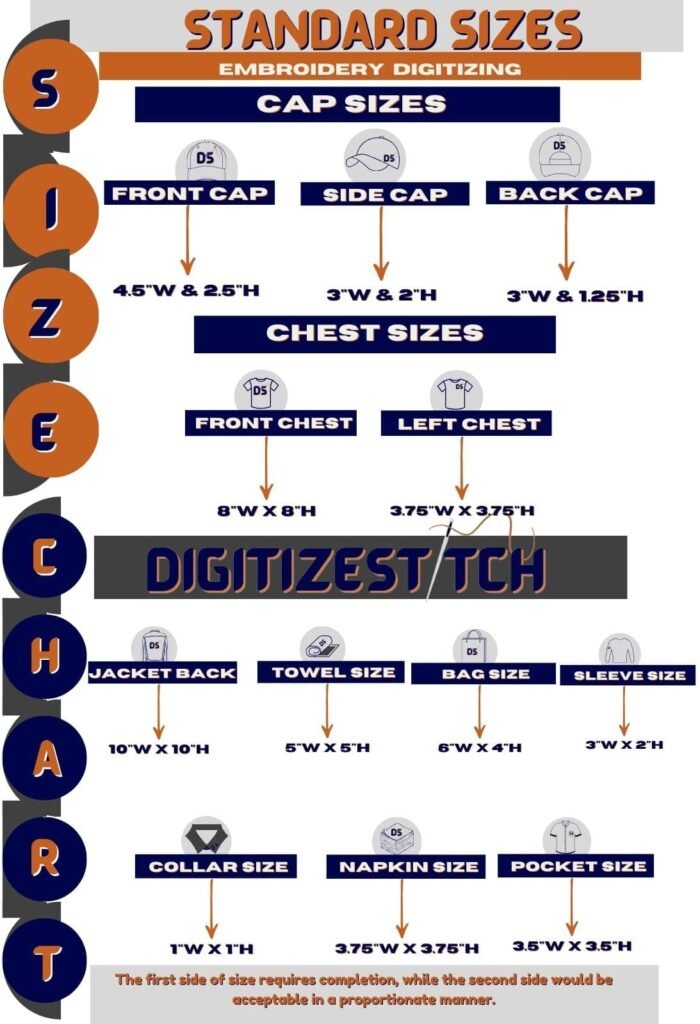
When it comes to digitized embroidery designs, ensuring accuracy is key. You want your designs to pop on any piece, but getting the size right is the first step. That’s where an embroidery size chart comes in handy! It may sound simple, but implementing the perfect size chart can make a huge difference in how your designs come to life. A digital embroidery designs guide is essential. It helps with custom, digitized machine embroidery designs. It ensures consistent quality.
This guide will show you, step-by-step, how to create and use the perfect embroidery design size guide for your business. Let’s make sizing simple, so your designs always fit perfectly!
Why Do I Even Need A Size Chart?
So, why is a size chart so important for your digitized embroidery designs? It’s all about precision. Imagine spending hours on a digitizing machine embroidery design, only to find it doesn’t fit quite right on the product. Frustrating, right? A size chart ensures that no matter the size or material you’re working with, your design is going to look flawless. Also, it keeps everything consistent and professional. That’s important when handling custom digitized embroidery designs.
Using a size chart is also crucial for helping clients visualize how their designs will look on different items. No more guessing, just clarity and confidence!
Steps To Create Your Perfect Size Chart
Now that you know why size charts are a game changer, let’s get into the details. Follow these easy steps to create your own embroidery size chart for digital embroidery designs.
1. Gather Your Designs
Start by collecting the machine embroidery designs you plan to size. You’ll want to categorize them by design type, such as logos, text, or intricate patterns. This step is important because not all designs work the same across different sizes. For example, text-based designs may need larger spacing compared to detailed patterns.
Take note of the largest and smallest sizes you typically offer for digitized embroidery designs. This will give you a better idea of the range to include in your size chart.
2. Identify Your Key Size Categories
Next, decide which size categories will best fit your business. Typically, you’ll want to include a range of options such as:
| Design Type | Small | Medium | Large | Extra Large |
| Text-Based | 1″ x 2″ | 2″ x 4″ | 4″ x 6″ | 6″ x 8″ |
| Logos | 2″ x 3″ | 3″ x 5″ | 5″ x 7″ | 7″ x 10″ |
| Detailed Patterns | 3″ x 3″ | 5″ x 5″ | 7″ x 7″ | 10″ x 10″ |
This chart is just an example, but feel free to customize it based on your specific custom digitized embroidery designs. These categories give clients a visual reference. They also help streamline your production process.
3. Measure And Test
Now comes the fun part! Print or stitch samples of your digital embroidery designs at the various sizes you’ve selected. Make sure to test them on different materials, as size can look different on a T-shirt versus a hat or a bag. This testing phase ensures that you know exactly how your designs will look in each size, and it helps to catch any potential scaling issues early on.
Don’t forget to measure your digitize embroidery designs once they’re on the actual material. Compare them to your size chart and adjust as needed. This step guarantees that what you promise to clients is exactly what they’ll receive.
Simplifying The Size Chart For Your Clients
Now that your embroidery size chart is ready, it’s time to make it as user-friendly as possible for your clients. The goal is to help them quickly understand how the sizes will work for their particular needs.
4. Create A Visual Reference Guide
Including pictures in your size chart is one of the best ways to simplify things for your customers. Compare your digitizing machine’s embroidery designs on various products, like hats, shirts, and bags, at different sizes. This visual reference can make all the difference. For example:
- Small logo on a cap vs. large logo on a jacket.
- Detailed patterns on a small patch vs. a large tote bag.
Seeing is believing. Your customers will appreciate visualizing their custom embroidery designs.
5. Provide Clear Instructions
Another way to make the size chart super useful is by giving clear instructions on how to choose the best size. Explain in simple terms which sizes are best for which products. For instance, a large digitized embroidery design may be perfect for the back of a jacket but overwhelming on a small T-shirt pocket.
Include tips like:
- “For small areas like caps or sleeves, we recommend the ‘Small’ size category.”
- “For the back of jackets or large tote bags, go for the ‘Large’ or ‘Extra Large’ designs.”
Make The Size Chart A Part Of Your Brand
Here’s where you can add a personal touch. You want your embroidery size guidelines to reflect your brand’s personality and make a lasting impression. So, how can you achieve that?
6. Branding Your Size Chart
Use your brand’s colors, fonts, and logos in the size chart. This makes it not only practical but also part of the overall customer experience. Every time a customer looks at your chart, they should feel like they’re getting something unique from your brand.
Consider adding a personal message or helpful tip at the bottom of your chart. Something like: “We’re here to help! Not sure which size is best? Contact us, and we’ll guide you to the perfect fit for your project.”
Beyond The Basics: Making Your Size Chart Dynamic
Want to go the extra mile? You can make your size chart even more interactive and engaging.
7. Create An Interactive Digital Chart
With today’s technology, why not make a digital version of your embroidery size chart that clients can use online? Include sliders where they can see how the designs will resize based on the product they choose. This can be a great way to outshine the competition. It will give your customers a top-notch experience with their embroidery designs.
There are many tools available online to help you create interactive charts. A simple PDF with clickable links or a full web tool will give your customers more control and options for visualization. This will lead to happier clients and smoother transactions.
Your Path To Perfectly-Sized Embroidery Designs
This guide will give you all you need. It will help you make a professional, reliable, and customer-friendly embroidery design size guide. It’s not just about the sizes. It’s about giving your clients an exceptional experience, from the first stitch to the final product. A good embroidery size chart will ensure a perfect fit for your digitized designs, whether on a tiny cap or a large jacket. So, what are you waiting for? Start working on that size chart today, and take your digitizing machine embroidery designs to the next level!
Also Read


